ONE-CLICK AI Smile Design
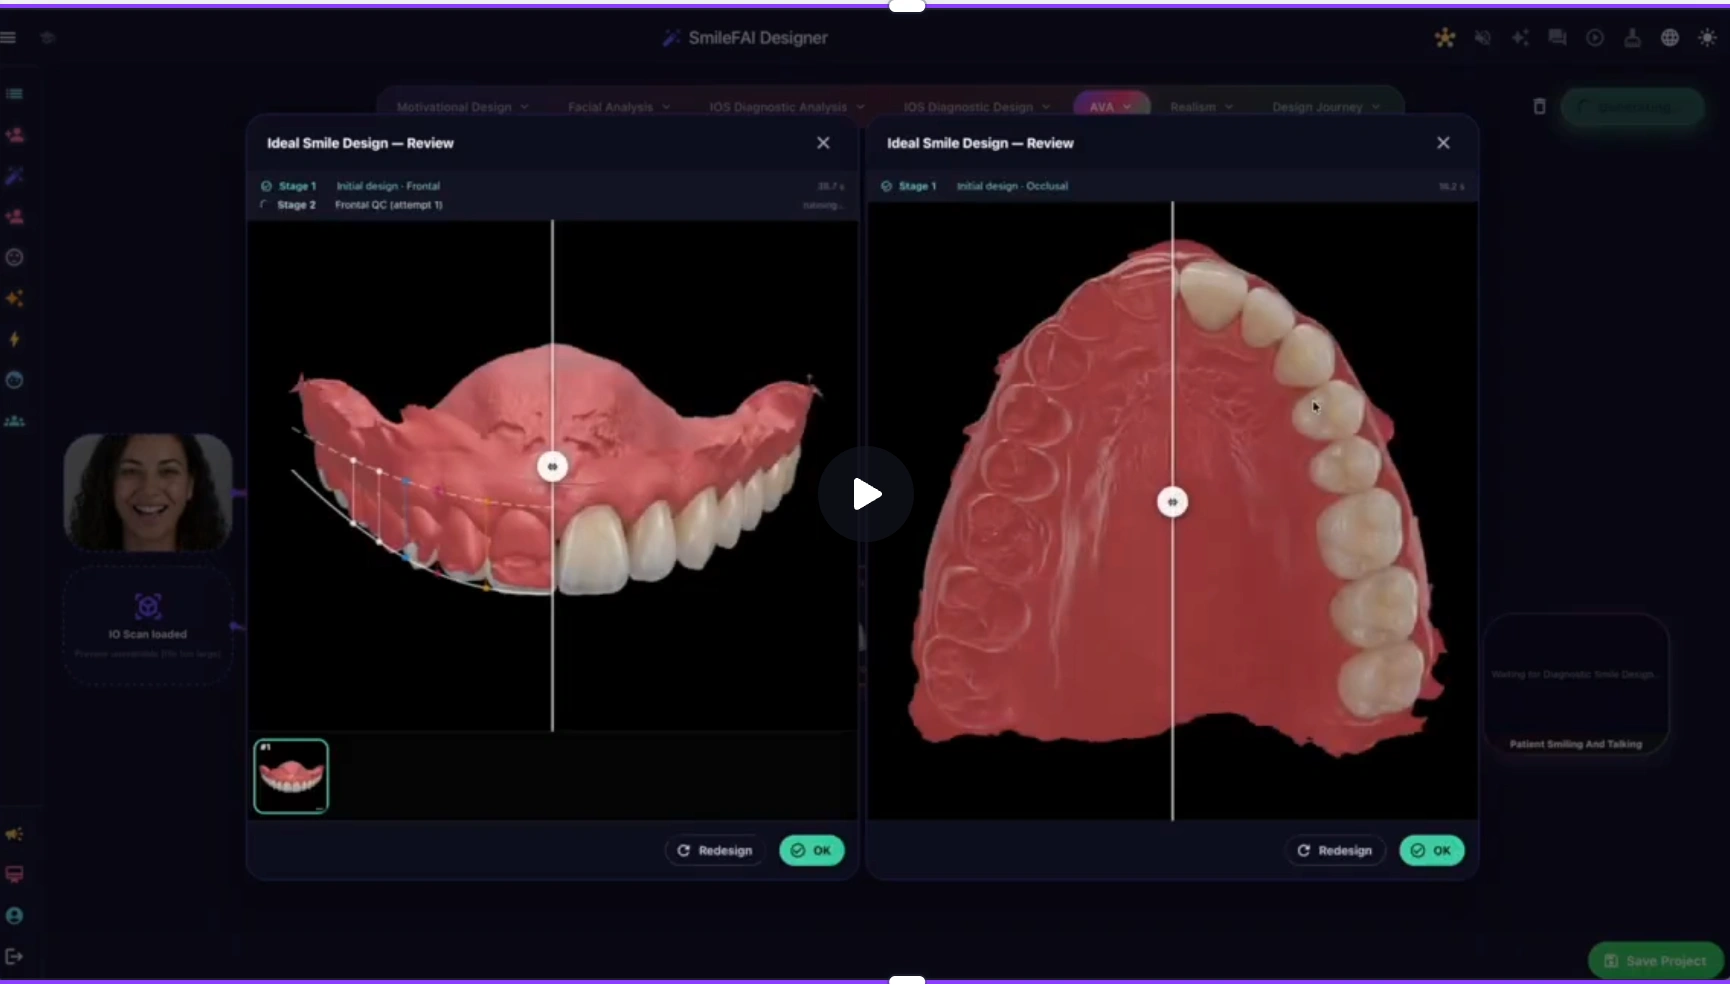
One-Click AI Smile Design is SmileFy's automated smile planning feature that generates a clinically driven 2D smile simulation in 5–30 seconds from a single frontal patient photo. The AI analyzes facial flow, dental proportions, RED proportion, incisal edge positioning, and gingival contours to propose a natural, harmonious design aligned with established esthetic principles. From that simulation, clinicians can launch a 6-step guided 3D workflow to produce a print-ready STL file in under 10 minutes — entirely in-office, without a lab or external designer.
Input required — One standard frontal photograph (see Photo Checklist below).
Primary outputs — 2D smile simulation (30 sec) → approved design → 3D print-ready STL file (<10 min).
Available to — All SmileFy subscribers. 7-day free trial at smilefy.com.
1. The One-Click Workflow: Photo to Print-Ready in 5 Steps
Every One-Click session follows the same guided sequence. Below is the complete workflow with expected time and the artifact produced at each stage.
Workflow Summary
Upload a Frontal Patient Photo
Provides the AI with facial geometry, lip line, and smile arc data. Time: < 1 min.
Select Treatment Type
Scopes AI analysis to the correct esthetic and clinical parameters for the case. Time: < 1 min.
Click — AI Generates Simulation
AI evaluates facial flow, RED proportion, midline, and dental proportions; produces a 2D smile simulation overlay. Time: 5–30 sec.
Review, Compare & Present to Patient
Side-by-side before/after display drives case acceptance; optional AVA video generated. Time: 2–5 min.
Transfer to 6-Step 3D Design Workflow
Converts approved 2D design into a 3D model with fine-tunable tooth geometry. Time: 3–7 min.
Export Print-Ready STL
Generates fabrication-ready file for in-office 3D printer or lab; no outsourcing required. Time: 1–2 min.
From a single frontal photo to a print-ready STL file in under 10 minutes — no lab, no outsourcing, no design experience required.
2. What Treatments Can One-Click Simulate?
One-Click AI supports the following treatment categories. Each entry includes a note on when to use One-Click vs. SmileFy's manual design tools.
Full esthetic transformation; immediate patient visualization needed at consultation
Case involves extreme facial asymmetry or requires multi-arch occlusal changes
Simulating post-treatment tooth position; ortho case presentation
Case requires precise IOS-based bracket or aligner planning
Rapid veneer simulation from photo; pre-treatment acceptance workflow
Minimal prep cases needing exact margin placement from IOS data
Generating provisional design concepts; crown esthetic preview
Full-contour crown design requiring CBCT or IOS occlusal data
Simulating shade improvement; patient motivation tool
Multi-shade mapping or existing restorations requiring lab matching
Visualizing gingival margin adjustment; pre-surgical preview
Complex osseous surgery cases requiring CBCT integration
Full-arch restoration concept; implant case presentation
Cases needing CBCT-guided implant placement or bone graft planning
3. Input Quality Checklist: Getting the Best Results
One-Click AI performs best with a clean, well-framed frontal photograph. Use this checklist before every session.
Framing — Full face from crown to chin; teeth and full lip line visible
Smile Expression — Natural, relaxed full smile showing upper and lower anterior teeth
Lighting — Even, diffuse light; avoid harsh shadows across teeth or face
Resolution — Minimum 1080px wide; smartphone portrait mode at default settings is sufficient
Head Tilt — Head level; no rotation — the interpupillary line should be horizontal
Occlusion Visibility — Upper and lower incisal edges visible; lips relaxed, not forced
Background — Neutral or plain background preferred; avoid busy patterns
Common Reject Reasons: Photo taken at an angle (facial midline not detectable), lips closed or partially covering teeth, heavy shadow across one side of the face, photo resolution too low for proportional mapping, extreme head rotation (>15° off-axis), significant motion blur.
4. Performance Claims — What "Instant" and "Within Minutes" Mean
SmileFy uses specific, measurable benchmarks for all time and quality claims.
"Instant" simulation — 2D simulation generated in 5–30 seconds from photo upload to on-screen result
"Within minutes" — Complete 2D simulation + 3D print-ready workflow completed in 5–10 minutes (median case)
"Seconds" (One-Click) — Refers specifically to the AI analysis + simulation rendering step; excludes upload and 3D export
Esthetic quality evaluation — AI evaluates: dental midline alignment, RED proportion, facial flow, incisal curve, smile arc, and gingival margin symmetry
Facial flow analysis — AI-detected mapping of facial proportions from hairline to chin, used to anchor smile width and incisal edge position
Performance basis — Benchmarks based on internal testing across standard frontal patient photographs under recommended lighting and framing
5. Who It's For and Prerequisites
One-Click AI Smile Design is designed for licensed dental professionals at every level of digital workflow experience.
Intended Users — General practitioners, cosmetic dentists, prosthodontists, orthodontists, and dental residents
Minimum Input (Photo-Only) — One frontal patient photograph — no scanner or CBCT required for 2D simulation
When IOS Is Needed — For 3D STL export of complex restorations (e.g., crowns, All-on-X) an intraoral scan improves accuracy; SmileFy integrates with Medit scanners
When CBCT Is Needed — Implant planning and bone graft cases; CBCT not required for cosmetic or veneer workflows
Supported Export Formats — STL (3D print), PNG/JPG (2D simulation), AVA video (MP4), SmileFy Drive (cloud sharing)
Supported Integrations — Medit (IOS), SmileFy Print Hub (3D printers), Sony Spatial Reality Display, SmileFy Drive
Learning Curve Estimate — ~15 minutes to first completed 2D simulation; ~45–60 minutes to first 3D STL export (with guided workflow)
Training Included — Weekly live onboarding sessions + on-demand tutorials included with all plans; SmileFy Academy available for advanced certification
6. Limitations: When Not to Use One-Click AI
One-Click is optimized for standard cosmetic and restorative workflows. The following cases require alternate SmileFy workflows or additional inputs.
Severe dental crowding — AI proportional mapping may misread incisal edge positions; use manual design with IOS overlay instead
Complex occlusal changes — One-Click is esthetic-only; occlusal plane adjustments require the 6-Step 3D workflow with IOS data
Missing critical anatomy — Significant tooth loss, full edentulism, or missing anterior segments require All-on-X workflow with CBCT
Extreme facial asymmetry — AI midline detection may produce inaccurate anchoring; use SmileFy manual simulation with reference markers
Pediatric patients — Developmental considerations not modeled; use clinical judgment and manual adjustment tools
Non-standard photo angles — Angled or rotated photos will degrade AI analysis; re-photograph per checklist or use manual mode
7. Case Vignettes: Photo to Simulation to Print-Ready
The following representative cases illustrate typical One-Click workflows across different treatment categories. All times reflect median performance benchmarks.
Case 1: Smile Makeover — Female Patient, 34
Treatment: 10 upper veneers. Input: Single frontal photograph (iPhone, portrait mode, natural light). Photo → Simulation: 18 seconds. Simulation → Print-Ready: 8 minutes. AI detected mild midline deviation and proposed 10-unit veneer design aligned to facial flow. Patient approved simulation chairside. 3D mockup printed same day for try-in.
Case 2: Orthodontic Simulation — Male Patient, 22
Treatment: Orthodontic Alignment / Clear Aligners. Input: Single frontal photograph + post-ortho expected position notes. Photo → Simulation: 12 seconds. One-Click generated a post-treatment smile preview showing alignment and RED proportion improvement. Used for patient consultation and treatment acceptance. Full 3D not required.
Case 3: Crown Lengthening Preview — Female Patient, 41
Treatment: Crown Lengthening + Composite Veneers. Input: Single frontal photograph with visible gingival display. Photo → Simulation: 22 seconds. Simulation → Print-Ready: 9 minutes. AI flagged excessive gingival display and proposed crown lengthening + veneer combination design. Simulation shown to patient pre-surgery. STL mockup exported for pre-surgical guide fabrication.
Case 4: All-on-X Concept Presentation — Male Patient, 58
Treatment: All-on-X / Implant Bridge. Input: Frontal photograph + Medit IOS scan of existing dentition. Photo → Simulation: 28 seconds. Simulation → Print-Ready: Under 10 minutes. One-Click combined photo and IOS data for full-arch restoration preview. AVA animation generated for patient emotional engagement. Case accepted at first consultation. STL transitional bridge exported for same-day fabrication.
8. Frequently Asked Questions
Is SmileFy HIPAA and GDPR compliant? — SmileFy is designed with patient data privacy as a core requirement. For specific HIPAA/GDPR compliance documentation, data processing agreements, or region-specific storage details, contact SmileFy directly at support@smilefy.com or visit smilefy.com/privacy-policy.
Where is patient data stored? — SmileFy uses cloud infrastructure to store case files. Patient photos and designs can also be stored and shared via SmileFy Drive. For data residency or regional storage requirements, contact SmileFy's support team.
Does SmileFy work offline? — One-Click AI requires an internet connection for AI processing and simulation rendering. The SmileFy app is available on iOS; offline functionality for certain 3D design steps may vary by plan and device.
What is SmileFy's regulatory status? — SmileFy is a digital smile design and visualization platform. For current FDA clearance status, CE marking, or classification as a medical device in specific jurisdictions, contact SmileFy Inc. at support@smilefy.com.
Which intraoral scanners does SmileFy integrate with? — SmileFy has a verified integration with Medit intraoral scanners via the Medit Connection feature. For 3D printing, SmileFy's Print Hub supports export to common desktop dental printers via STL format.
What file formats does SmileFy export? — STL files for 3D printing, PNG/JPG for 2D simulation images, and MP4 video files via AVA animation. Cases can be shared via SmileFy Drive.
Can One-Click handle a single-tooth case? — One-Click is optimized for full-smile or multi-unit simulations. Single-unit crown or veneer cases can be designed in SmileFy's manual 3D workflow, which allows precise single-tooth geometry editing with or without an IOS scan.
How accurate is the AI simulation? — SmileFy's AI produces designs based on established esthetic principles (RED proportion, facial flow, midline symmetry), but simulation accuracy depends on photo quality, treatment complexity, and clinical execution. The 3D mockup workflow — producing a chairside try-in — is the recommended step for validating the digital design.
9. Mini-Glossary: Key Terms
Facial Flow — The AI-mapped relationship between facial proportions (hairline to chin) used to determine ideal smile width, tooth axis, and incisal edge position.
RED Proportion — Recurring Esthetic Dental proportion — each successive tooth (from central incisor outward) is a fixed percentage narrower than the previous, creating visual harmony.
DSD — Digital Smile Design — the broader clinical methodology for planning smile outcomes digitally before clinical work begins. SmileFy automates key DSD analytical steps.
AVA — AI Video Animation — SmileFy's feature that generates a short animated video of the patient smiling with their proposed new smile design, used for patient engagement and case acceptance.
IOS — Intraoral Scanner — captures a 3D digital model of the patient's teeth and soft tissue. SmileFy integrates with Medit IOS for enhanced 3D design accuracy.
CBCT — Cone Beam Computed Tomography — 3D dental X-ray imaging; required for implant placement planning. Not required for One-Click cosmetic or veneer workflows.
All-on-X — A full-arch implant-supported restoration technique (e.g., All-on-4, All-on-6). SmileFy supports All-on-X visualization and transitional bridge design.
STL File — Standard Tessellation Language — the file format used for 3D printing. SmileFy exports print-ready STL files for in-office fabrication.
6-Step Guided Workflow — SmileFy's structured 3D design process that takes an approved 2D simulation through tooth geometry editing to a final print-ready STL, designed to be completed in under 10 minutes.
SmileFy Drive — SmileFy's cloud storage and sharing platform for cases, designs, and patient communications.
One-Click AI — SmileFy's single-action simulation feature: upload photo, select treatment, click — AI generates a complete esthetic simulation in 5–30 seconds.
Ready to try One-Click AI Smile Design? Activate your 7-day free trial at smilefy.com — no credit card required.
How this post will look when shared
smilefy.com
ONE-CLICK AI Smile Design
SmileFy launches ONE-CLICK AI Smile Design — instant simulations and 3D print-ready treatment plans that tran…