Realistic 3D Veneers: Line Angles, Light Reflection & Texture in the AI Era
Clinical workflow
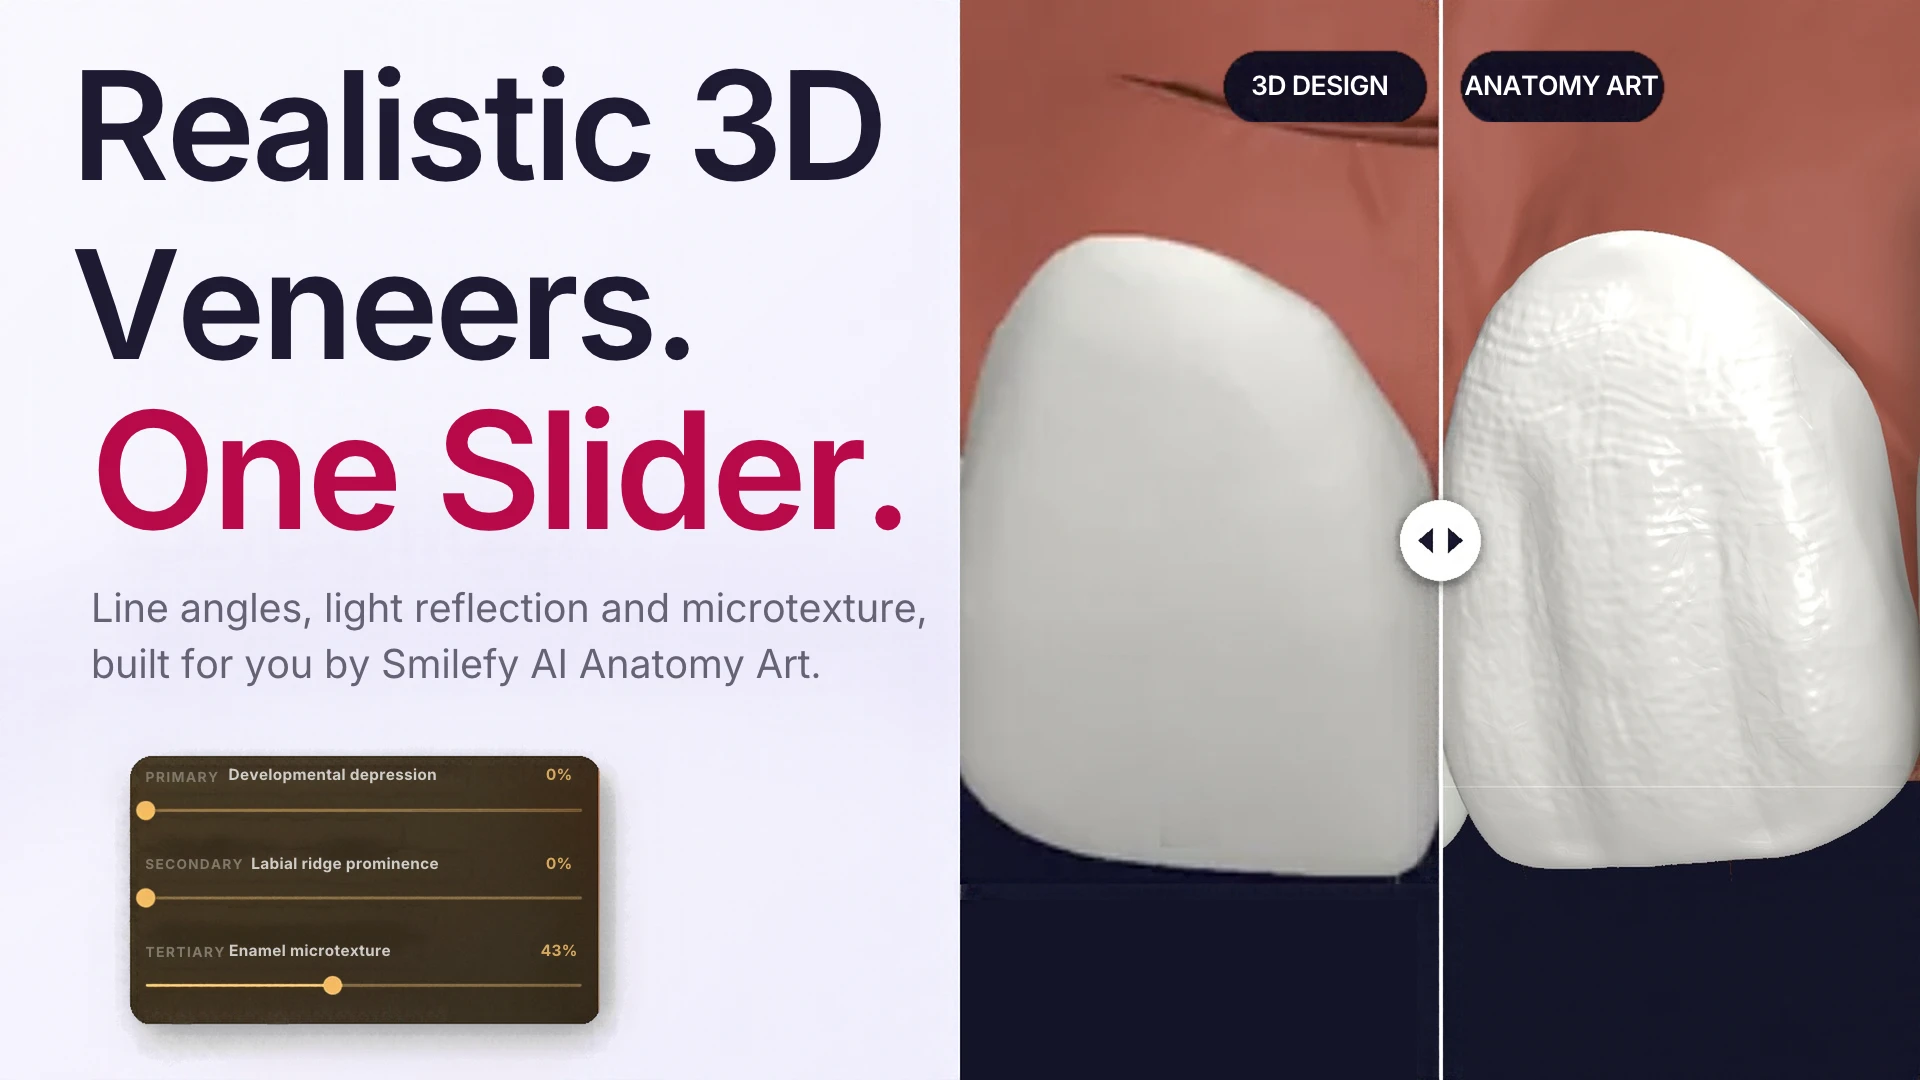
Two veneers can match in shade, length and width and still look completely different in the mouth. The difference is in the surface. Line angles, light reflection zones, developmental depressions and enamel microtexture decide how light leaves the tooth, and light is what the eye reads as “natural”.
These details have always been the hardest part of anterior esthetics, by hand in wax or composite and on screen in CAD software. That difficulty has now been redefined into a solution built to help thousands of dentists around the world. With Anatomy Art, SmileFy AI builds natural tooth anatomy for you, based on real morphology. You choose how much morphology each tooth gets with one slider, and every 3D veneer gets its own personality, in harmony with your patient and your own clinical vision. Less time sculpting, more time where it matters: with the patient.
In short
Line angles set the visible “face” of the tooth. Moving them changes how wide or narrow a tooth looks, even when its real size stays the same.
Light reflection zones sit between the line angles. Their size and shape define perceived width, length and brightness.
Biomimetic texture (lobes, depressions, perikymata, microgrooves) must match the patient’s age, sex and tooth substrate, and must harmonize with the neighbouring teeth.
Doing this by hand or in classic CAD libraries is slow and depends on artistic skill. SmileFy AI generates it from real anatomy and lets the dentist dial it up or down.
A textured 3D design also makes 3D-printed resin veneers easier to stain and characterize, so they look natural with less chairside work.
Line angles and light reflection: the anatomy the eye actually reads
What are line angles? Transitional line angles are the lines where the facial (labial) surface turns into the proximal surfaces. Every anterior tooth has a mesiofacial and a distofacial line angle. Kallala et al. describe them as poorly described in the literature but key to achieving the desired tooth shape, especially on the maxillary central incisor. Their misplacement can spoil an otherwise perfect restoration (Case Reports in Dentistry, 2022).
The “face of the tooth”. The area bounded by the line angles is the part of the labial surface that reflects light straight back to the viewer. Abdalla, writing in the AACD’s Journal of Cosmetic Dentistry, explains that this “face” determines perceived tooth size. Teeth of identical size look different if their line angles are not mirror images, because light is reflected from a smaller or larger surface (jCD, 2020).
This is why clinicians use line angles as an optical tool:
Line angles moved toward the centre of the tooth make it look narrower and longer.
Line angles moved outward make it look wider and shorter.
Asymmetric line angles between contralateral teeth make two identical restorations look mismatched.
The distance between the labial line angles has its own name in the literature: “esthetic width”. Wen et al. measured it on 4,264 maxillary and mandibular anterior teeth and concluded that it significantly influences the visual perception of teeth and smile (J Adv Prosthodont, 2022).
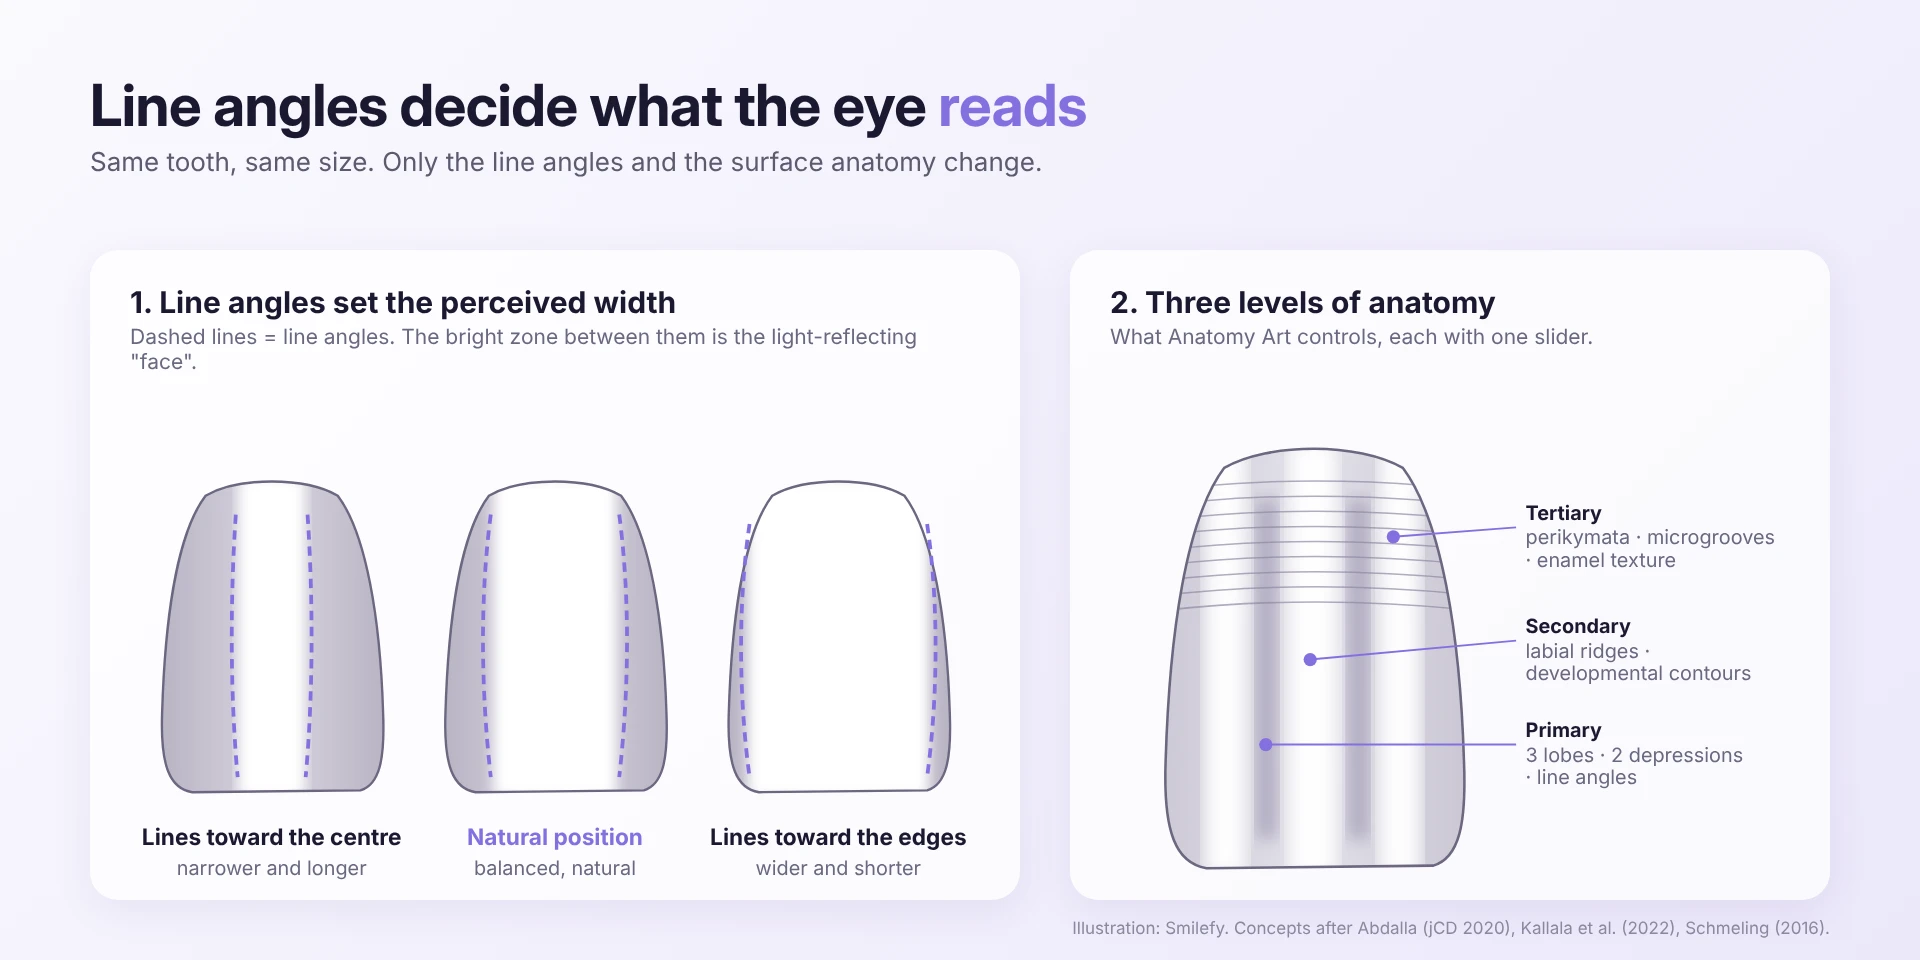
Light reflection zones. Between the line angles, the labial surface is not flat. It has three developmental lobes, two vertical depressions between them, and a gentle convexity from cervical to incisal. Each of these breaks the reflection into vertical bands of light and shadow. A tooth without them reflects light as one flat mirror and immediately looks artificial.
Gloss matters as much as shape. In a study published in Operative Dentistry, observers noticed a gloss difference of 6.4 gloss units in half of the cases, and half rejected a difference of 35.7 GU compared with a polished natural tooth (Operative Dentistry, 2020). Surface texture controls gloss, so getting the texture right is part of getting the colour right.
Biomimetic texture depends on age, sex and the tooth substrate
Natural enamel texture works on two scales. Macrotexture is the lobes, vertical ridges and developmental depressions that create large reflection areas. Microtexture is the fine horizontal grooves left by enamel formation, the perikymata, which scatter light diffusely. Schmeling notes that a surface rich in these small grooves produces diffuse reflection and lowers translucency (ODOVTOS Int J Dent Sci, 2016).
There is no single “correct” texture. It has to fit the patient.
- Factor
- Age
- What changes in natural teeth
- Young teeth show marked lobes, depressions and perikymata. With wear, enamel thins, the surface gets smoother and translucency rises (Schmeling, 2016).
- What it means for the design
- Younger patients: more accentuated morphology and microtexture. Mature patients: softer lobes, flatter surfaces, less microtexture.
- Factor
- Sex
- What changes in natural teeth
- In 3D scans of 120 young adults, tooth shape alone predicted sex for the lateral incisor and canine, even after size standardization (Horvath et al., Eur J Esthet Dent, 2012).
- What it means for the design
- Use it as a starting point, not a rule. Rounder, softer transitions read as more feminine; more angular, marked line angles read as more masculine.
- Factor
- Substrate
- What changes in natural teeth
- Enamel thickness, dentin colour and any discolouration change how much light passes through and returns. Thinner enamel shows more of the dentin (Schmeling, 2016).
- What it means for the design
- Microtexture scatters light. More texture can help lift value and soften show-through; a smoother surface keeps a high-value tooth glassy.
- Factor
- Neighbouring teeth
- What changes in natural teeth
- Untreated teeth in the smile already carry their own texture and wear pattern.
- What it means for the design
- New veneers must match the morphology intensity of the adjacent teeth, or they stand out as “new”.
| Factor | What changes in natural teeth | What it means for the design |
|---|---|---|
| Age | Young teeth show marked lobes, depressions and perikymata. With wear, enamel thins, the surface gets smoother and translucency rises (Schmeling, 2016). | Younger patients: more accentuated morphology and microtexture. Mature patients: softer lobes, flatter surfaces, less microtexture. |
| Sex | In 3D scans of 120 young adults, tooth shape alone predicted sex for the lateral incisor and canine, even after size standardization (Horvath et al., Eur J Esthet Dent, 2012). | Use it as a starting point, not a rule. Rounder, softer transitions read as more feminine; more angular, marked line angles read as more masculine. |
| Substrate | Enamel thickness, dentin colour and any discolouration change how much light passes through and returns. Thinner enamel shows more of the dentin (Schmeling, 2016). | Microtexture scatters light. More texture can help lift value and soften show-through; a smoother surface keeps a high-value tooth glassy. |
| Neighbouring teeth | Untreated teeth in the smile already carry their own texture and wear pattern. | New veneers must match the morphology intensity of the adjacent teeth, or they stand out as “new”. |
This is what gives each tooth its own personality. A 25-year-old with crisp lobes and a 60-year-old with worn, smooth enamel should never receive the same library tooth.
Why it is so hard, by hand and on screen
Manual workflow (wax-up, direct composite, ceramics). Line angles, lobes and perikymata are carved or ground in one tooth at a time. Board-certified clinician Robert Margeas describes creating line angles, perikymata and developmental depressions during finishing, then polishing carefully so the texture is not lost (DentistryIQ). The result depends on the operator’s eye, hand and time. It is hard to repeat symmetrically on contralateral teeth.
Digital workflow (CAD libraries). Most CAD software starts from a tooth library: a set of predefined templates. Researchers at the University of Hong Kong point out that these templates still need manual adjustment to fit each patient (The Dentist, HKU research). A 2026 study in Dental Materials found that the CAD strategy itself, library-based, technician-refined or AI-assisted, produces measurable differences in crown morphology (Dental Tribune).
In practice, this means:
Library teeth often arrive smooth or generic, with the same texture on every patient.
Sculpting lobes and microtexture with digital brushes takes time and artistic skill, tooth by tooth.
Brushing texture by hand can distort the outline, incisal edge, contacts or margin that were already approved.
Without texture in the file, the printed or milled veneer comes out flat and the technician or dentist has to add it all afterwards.
How SmileFy Anatomy Art creates realistic, unique 3D veneers
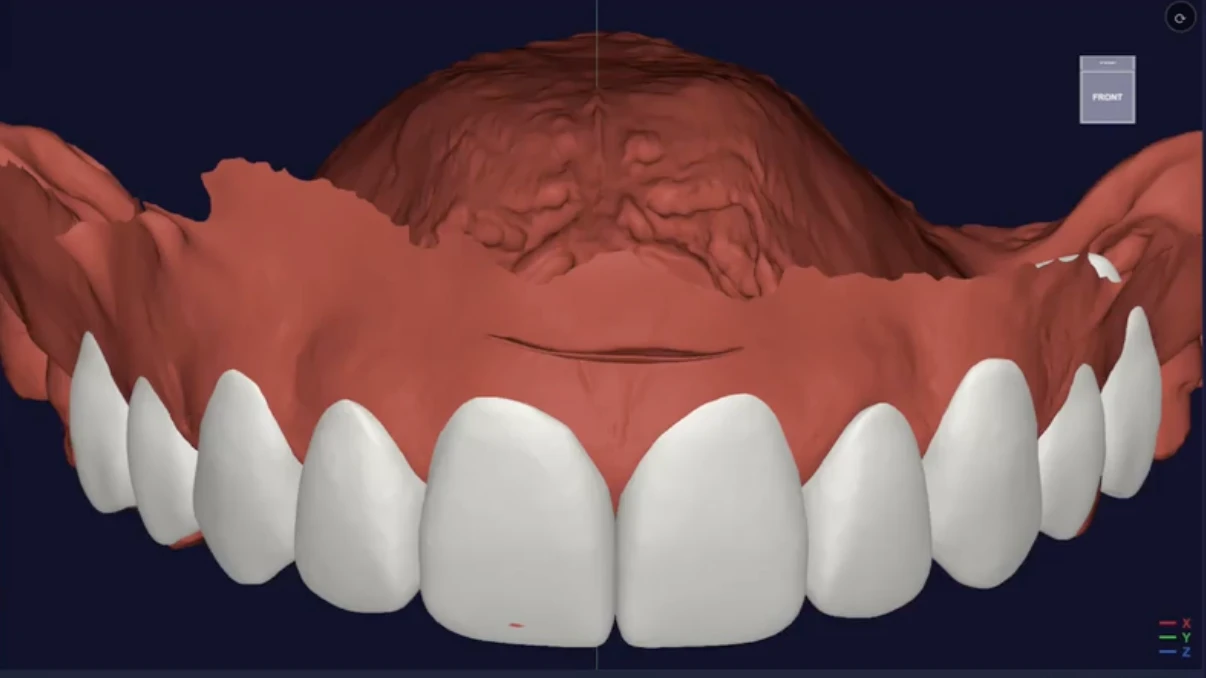
Anatomy Art is a SmileFy AI feature that adds natural tooth anatomy to your 3D veneer design automatically. You do not sculpt. You decide how much anatomy each tooth group gets, and the AI builds it on real geometry.
The panel works per tooth group (centrals, laterals, canines) and on three levels of anatomy:
- Level
- Primary: developmental depressions
- What it controls
- 3 lobes, 2 depressions, line angles
- Effect on light
- Defines the reflection face and the vertical light bands
- Level
- Secondary: labial ridge prominence
- What it controls
- Vertical ridges and developmental contours
- Effect on light
- Adds depth and the play of light and shadow across the surface
- Level
- Tertiary: enamel microtexture
- What it controls
- Perikymata, microgrooves, enamel texture
- Effect on light
- Breaks up gloss for a natural, less “plastic” surface
| Level | What it controls | Effect on light |
|---|---|---|
| Primary: developmental depressions | 3 lobes, 2 depressions, line angles | Defines the reflection face and the vertical light bands |
| Secondary: labial ridge prominence | Vertical ridges and developmental contours | Adds depth and the play of light and shadow across the surface |
| Tertiary: enamel microtexture | Perikymata, microgrooves, enamel texture | Breaks up gloss for a natural, less “plastic” surface |
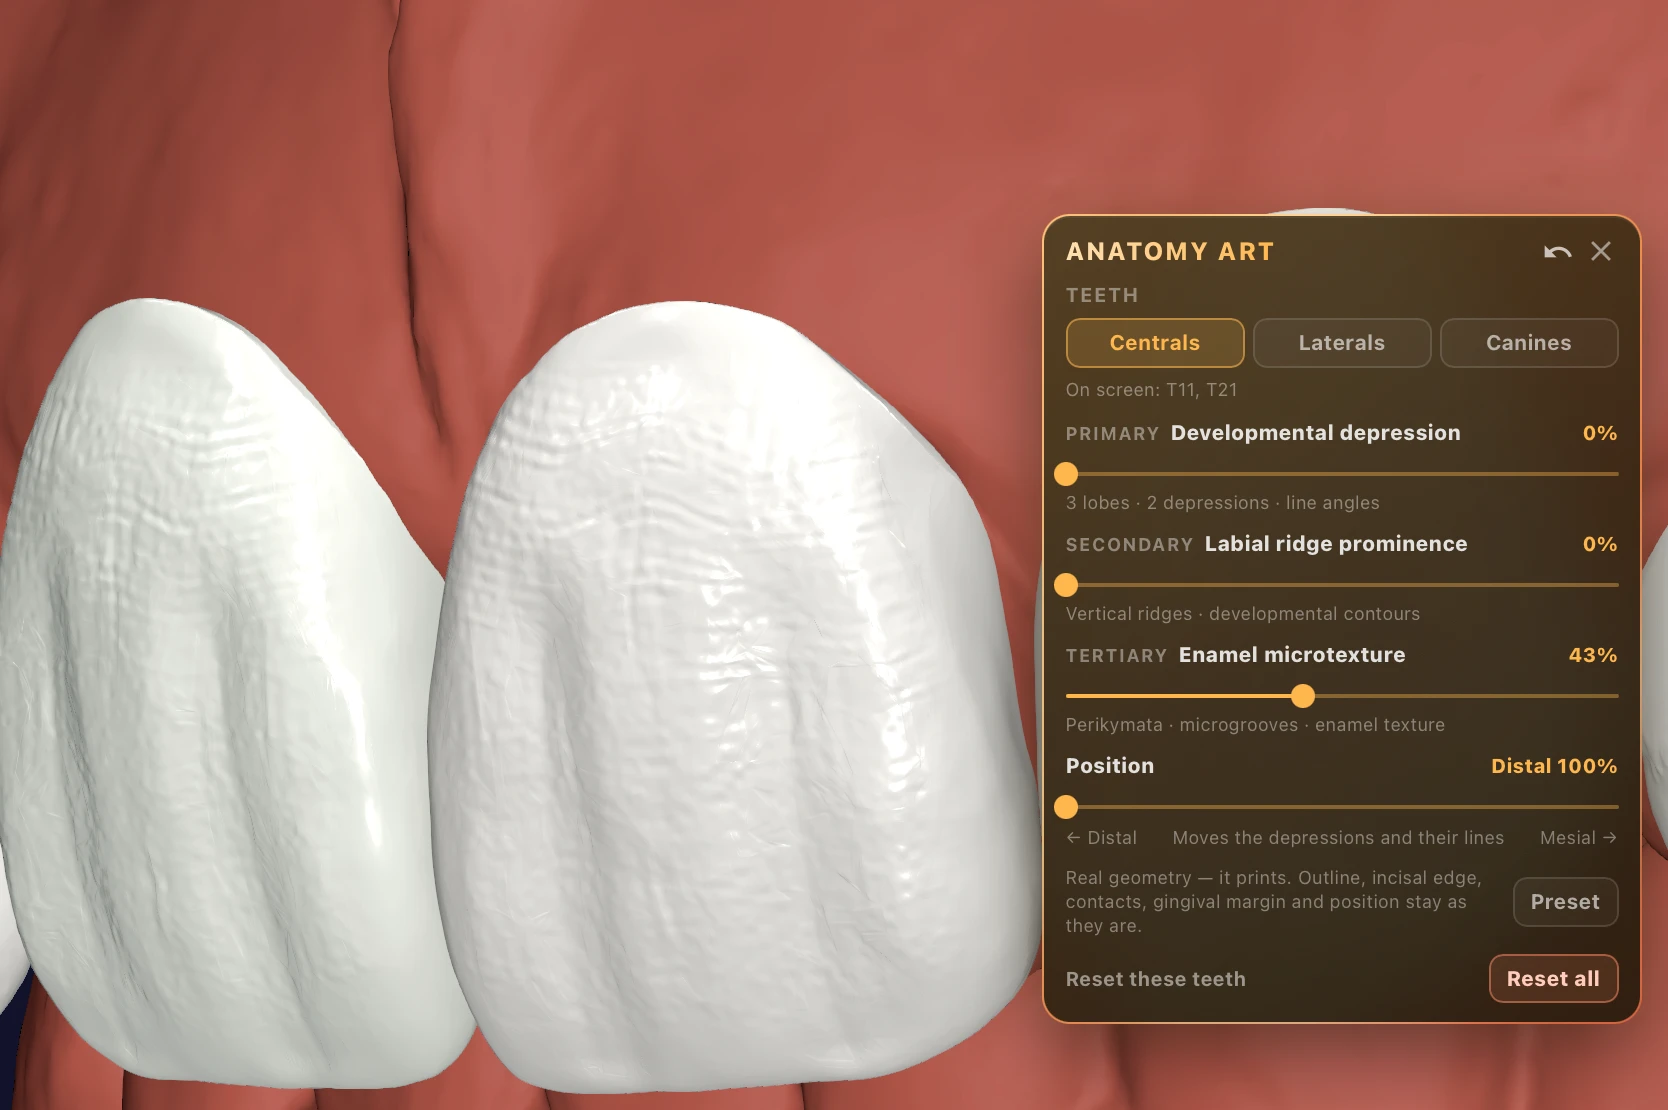
Each level has a slider. Slide right for more accentuated anatomy, left for a smoother, more mature surface. The outline, incisal edge, contacts, gingival margin and tooth position stay exactly as designed, so the anatomy never undoes the smile you already approved with the patient.
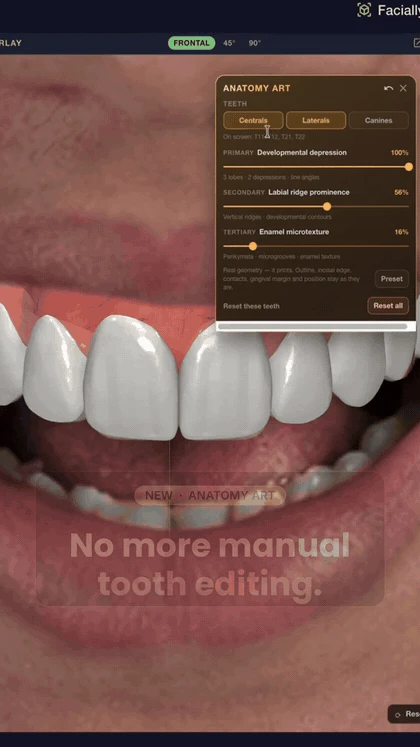
Deciding how much morphology each tooth needs. SmileFy helps the dentist take a clear position on a question that used to be pure intuition: when should the teeth carry more accentuated morphology, and when less?
Match the neighbours. If the patient keeps natural teeth in the smile, set the veneers to the same anatomy intensity so they blend in.
Match the patient. Younger, more vibrant smiles take more depressions and microtexture. Mature smiles take softer, smoother surfaces.
Match the substrate and the plan. Adjust texture where you need more light scattering, and keep it smoother where you want a glassier, high-value tooth.
Match the feedback. Show the patient both versions in seconds and decide together.
The result is a set of 3D veneers that are customized and unique: each tooth has its own personality, in line with the personality of the patient.
Easier 3D printing and resin characterization
Permanent 3D-printed resins are increasingly used for veneers and crowns (Vichi et al., Applied Sciences, 2024). Their final look depends on two steps after printing: staining and characterization, then finishing and polishing.
When the anatomy is already in the 3D file, both steps get easier:
Stain follows the anatomy. Depressions and microgrooves naturally hold more stain, and the lobes and ridges stay brighter. Characterization becomes a matter of filling what is already there, not painting an illusion on a flat surface.
Less manual texturing after printing. Lobes, ridges and perikymata come out of the printer. You keep the texture by polishing gently instead of grinding it in with burs.
Predictable and repeatable. The same slider values give the same anatomy on contralateral teeth and on remakes.
Real geometry that prints. Anatomy Art changes the actual mesh, not just the on-screen rendering, so what the patient approved is what comes out of the printer.
In SmileFy, a single left-and-right slider characterizes the whole tooth. The veneer is ready to print and simple to paint, with a natural look as the starting point.
Generic 3D texture vs SmileFy Anatomy Art
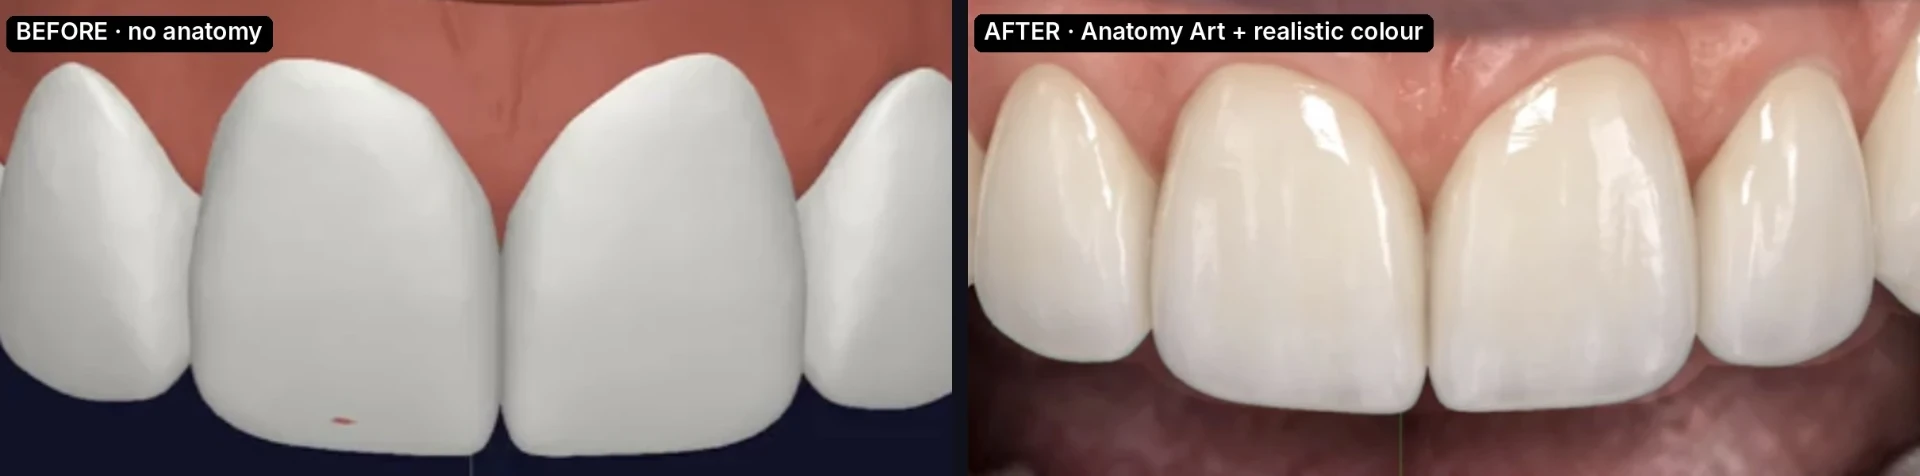
The difference is easiest to see side by side, under the same light and from the same angle.
- Line angles
- Generic CAD library tooth
- Fixed by the template, often too wide or too soft
- SmileFy Anatomy Art
- Placed by the AI and kept symmetrical per tooth group
- Light reflection
- Generic CAD library tooth
- One flat, mirror-like highlight
- SmileFy Anatomy Art
- Vertical bands of light and shadow, like natural enamel
- Depressions and lobes
- Generic CAD library tooth
- Absent or identical on every tooth
- SmileFy Anatomy Art
- Adjustable intensity for centrals, laterals and canines
- Microtexture
- Generic CAD library tooth
- Smooth, “plastic” gloss
- SmileFy Anatomy Art
- Perikymata and microgrooves that break up the gloss
- Personalization
- Generic CAD library tooth
- Same tooth for every patient
- SmileFy Anatomy Art
- Tuned to age, sex, substrate, neighbours and patient feedback
- Time
- Generic CAD library tooth
- Minutes to hours of sculpting per case
- SmileFy Anatomy Art
- Seconds, with one slider
| Generic CAD library tooth | SmileFy Anatomy Art | |
|---|---|---|
| Line angles | Fixed by the template, often too wide or too soft | Placed by the AI and kept symmetrical per tooth group |
| Light reflection | One flat, mirror-like highlight | Vertical bands of light and shadow, like natural enamel |
| Depressions and lobes | Absent or identical on every tooth | Adjustable intensity for centrals, laterals and canines |
| Microtexture | Smooth, “plastic” gloss | Perikymata and microgrooves that break up the gloss |
| Personalization | Same tooth for every patient | Tuned to age, sex, substrate, neighbours and patient feedback |
| Time | Minutes to hours of sculpting per case | Seconds, with one slider |
See the colour before you print: the virtual 3D mockup
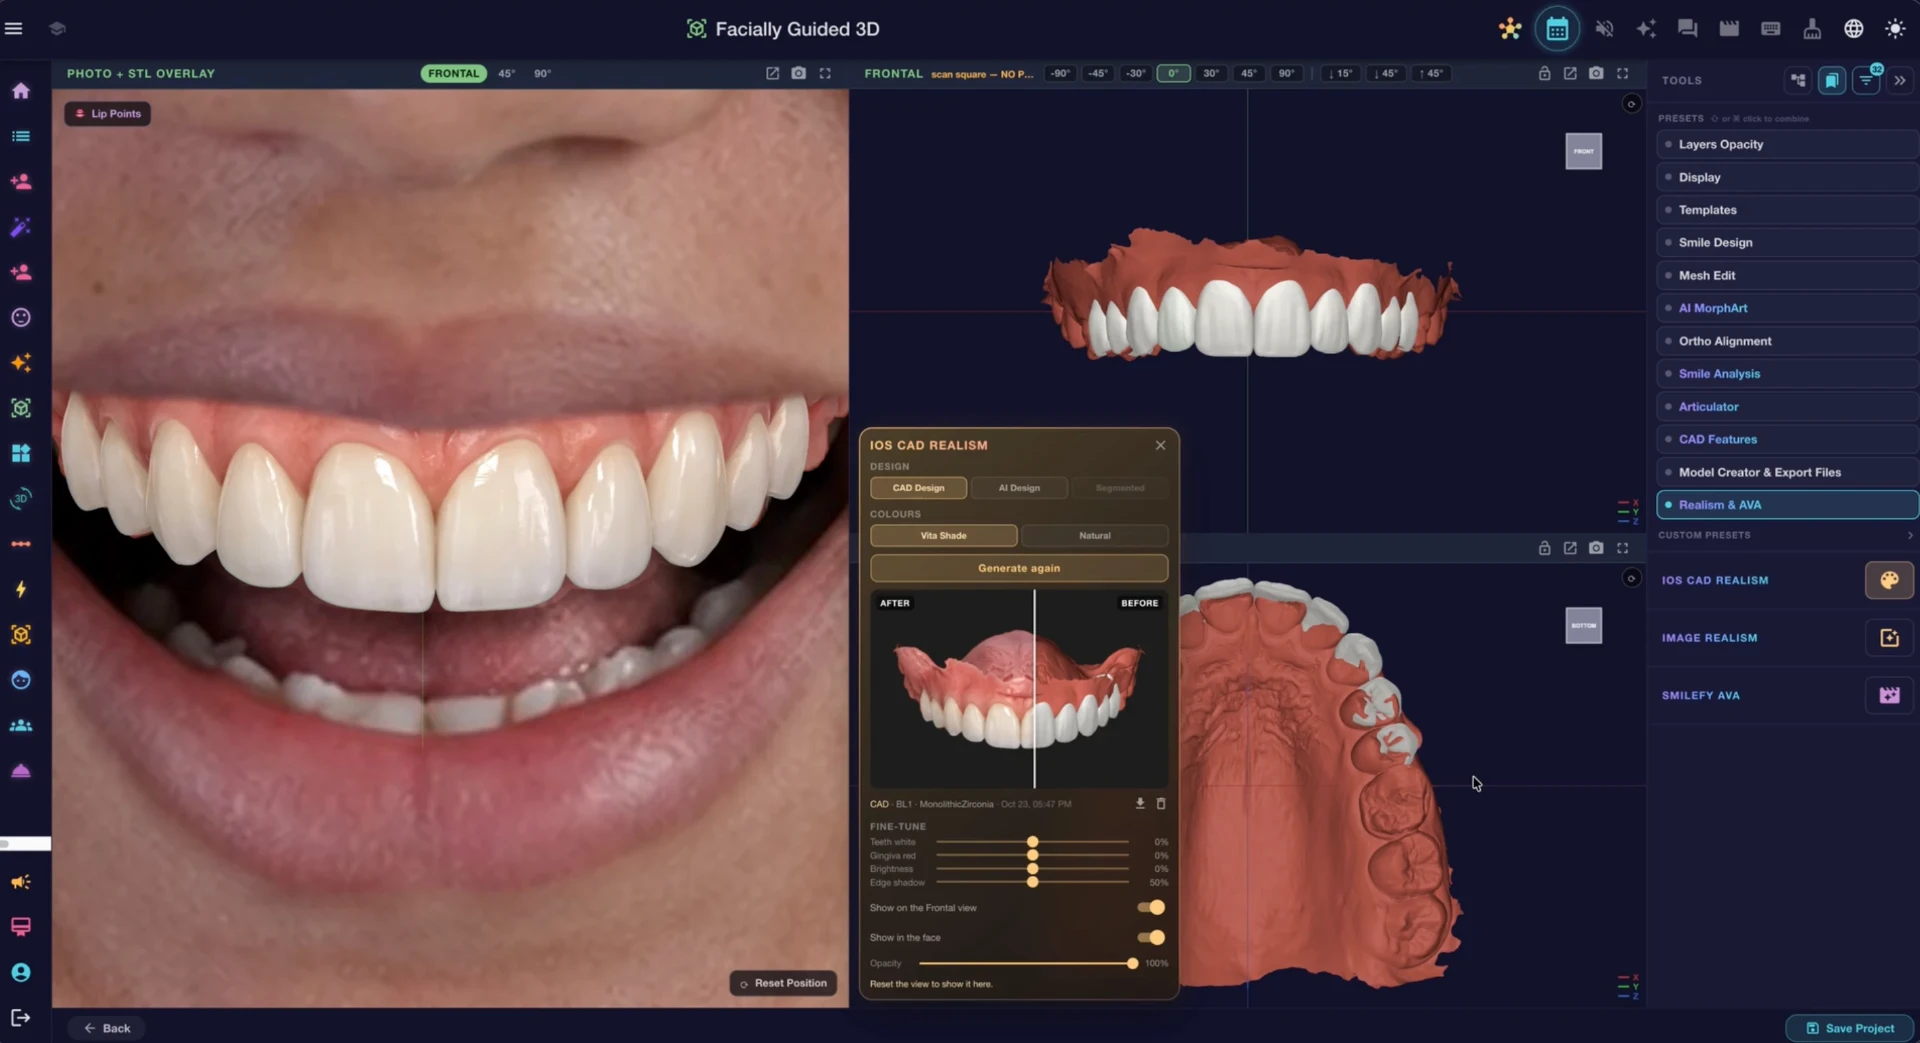
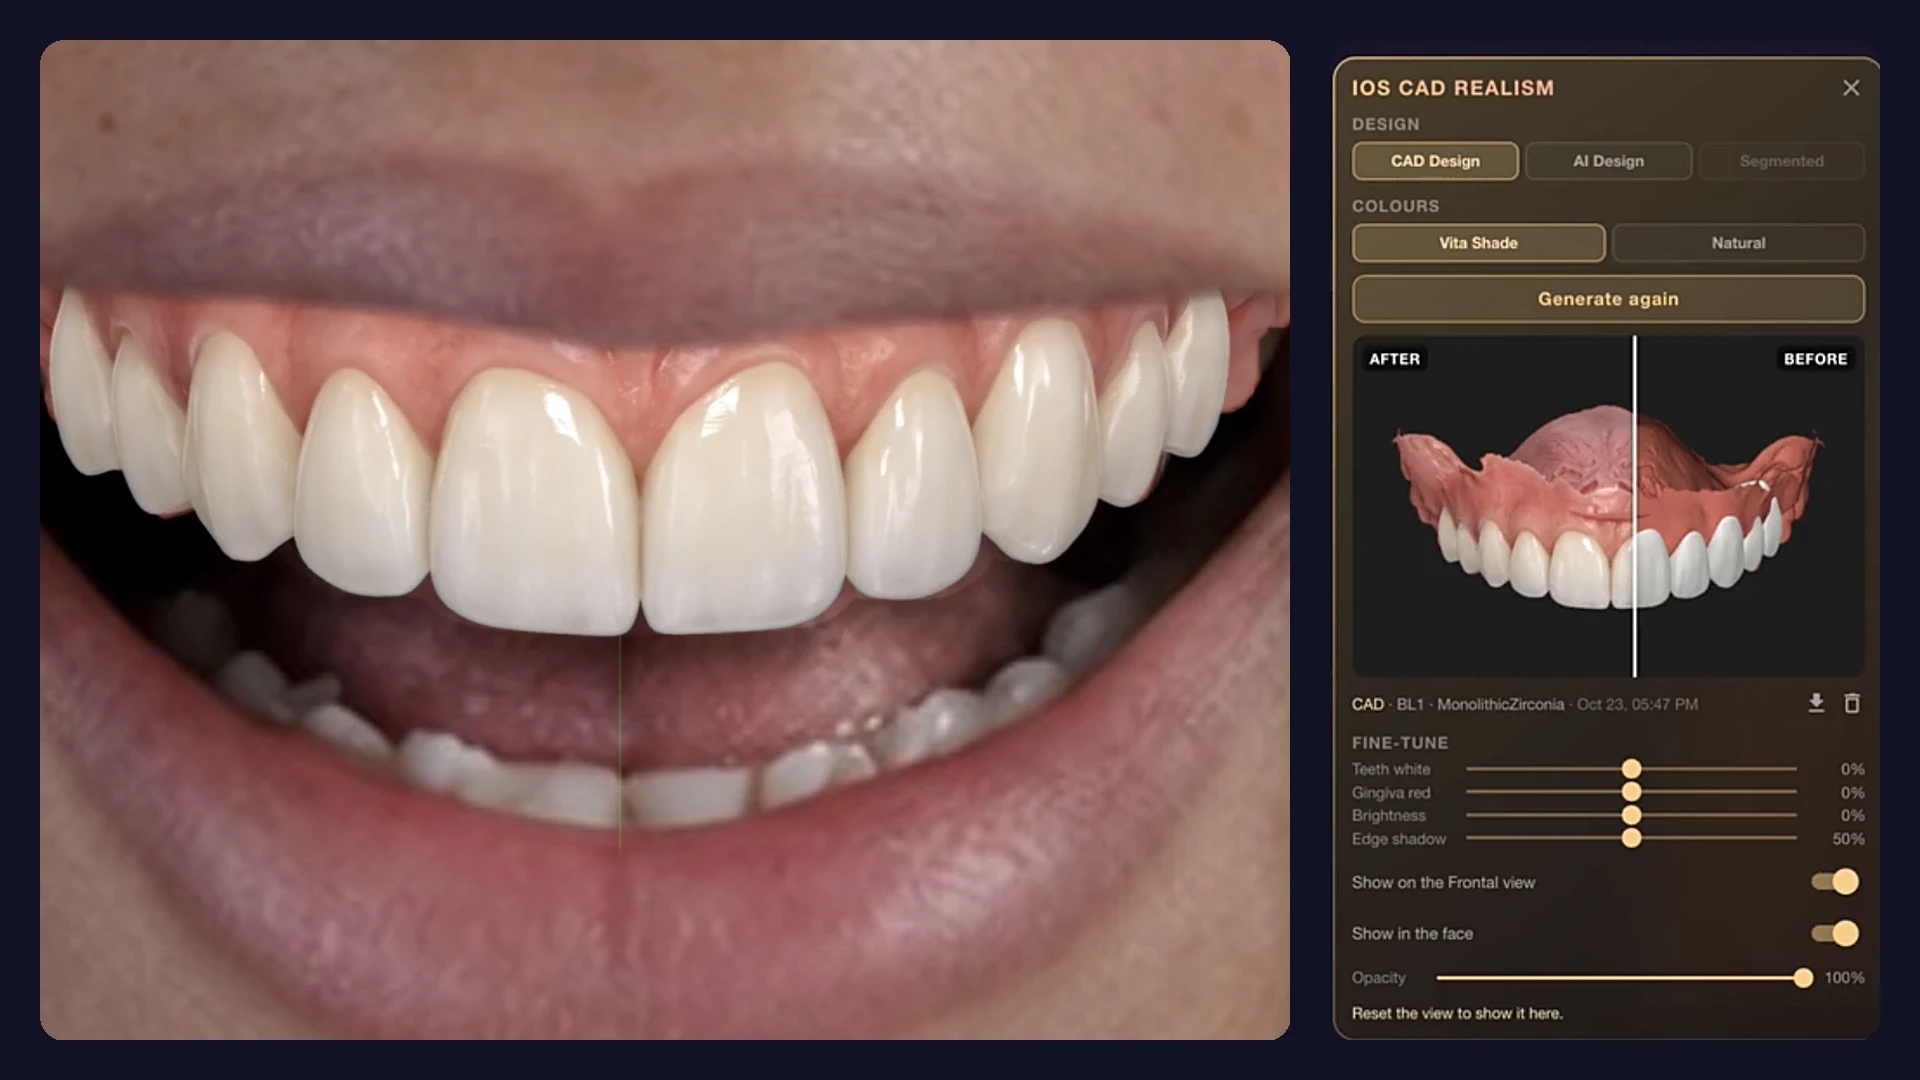
SmileFy renders the 3D design with realistic colour directly on the patient’s face. The patient sees the shade, the light reflection and the dynamics of the new smile in a virtual 3D mockup, with no test print needed. The IOS CAD Realism panel lets you switch between a CAD or AI design, pick Vita Shade or natural colours, and fine-tune whiteness, brightness and edge shadow.
Frequently asked questions
What are line angles in dentistry?
Line angles are the transitions between the facial surface and the proximal surfaces of a tooth. On anterior teeth, the mesiofacial and distofacial line angles frame the area that reflects light, so they control how wide or narrow the tooth looks.
Why do some veneers look fake?
Most often the surface is too flat. Without lobes, depressions and microtexture, a veneer reflects light like a mirror, and the eye reads it as artificial even when the shade is right.
What are perikymata?
Perikymata are fine horizontal growth lines on the enamel surface, most visible on young anterior teeth. They scatter light and soften gloss, and they wear away with age.
Should veneer texture change with the patient’s age?
Yes. Younger teeth usually show more pronounced lobes, depressions and perikymata. Older teeth are smoother and more translucent from wear. Matching this keeps the result natural.
What is SmileFy Anatomy Art?
Anatomy Art is a SmileFy AI feature that generates realistic tooth anatomy (line angles, developmental depressions, labial ridges and enamel microtexture) on 3D veneer designs. The dentist adjusts the intensity with one slider per level, without changing outline, contacts or margins.
Does the texture survive 3D printing?
Anatomy Art changes the real 3D geometry, so the anatomy is part of the printed veneer. It also makes staining and characterization of 3D-printed resin veneers simpler.
See it on your own cases
Stop sculpting teeth by hand. Let SmileFy AI build the anatomy, and spend your time on the patient.
References
1. Kallala R, Gassara Y, Azouzi I, et al. Facial Line Angles: A Key to Tooth-like Rehabilitation. Case Reports in Dentistry, 2022. doi:10.1155/2022/4917536
2. Abdalla R. Key Treatment Tools to Achieve Ideal Esthetic Results for Maxillary Central Incisor Crowns. Journal of Cosmetic Dentistry (AACD), 36(2), 2020. aacd.com
3. Wen C, Ye H, Chen H, et al. Biometry of width between labial transitional line angles in anterior teeth. J Adv Prosthodont, 2022;14:1–11. doi:10.4047/jap.2022.14.1.1
4. Perceptibility and Acceptability of Surface Gloss Variations in Dentistry. Operative Dentistry, 45(2):134–142, 2020. doi:10.2341/18-184-C
5. Schmeling M. Color Selection and Reproduction in Dentistry. Part 2: Light Dynamics in Natural Teeth. ODOVTOS Int J Dent Sci, 18(2):23–40, 2016. doi:10.15517/ijds.v18i2.24493
6. Horvath SD, Wegstein PG, Lüthi M, Blatz MB. 3D study of gender-specific maxillary anterior tooth form. Eur J Esthet Dent, 2012;7:334–343. PubMed 22908080
7. Margeas R. Maintaining surface texture during the final finishing of anterior composite restorations. DentistryIQ. dentistryiq.com
8. University of Hong Kong. AI smart manufacturing for dental crowns. The Dentist. hku.hk
9. Influence of digital crown design software on morphology, occlusal characteristics, fracture force and marginal fit. Dental Materials, January 2026 (via Dental Tribune). dental-tribune.com · PubMed 40947383
10. Vichi A, Mura G, Vannini F, et al. Effects of Repolishing Systems on Surface Characteristics of a 3D-Printed Permanent Material. Applied Sciences, 15(1):171, 2024. doi:10.3390/app15010171
2-Day Hands-On Course with SmileFy
3D Printed Veneers Course:From Digital Treatment Plan to Final Restoration
Master the Complete Digital Veneer Workflow — From IO Scan to 3D Printed Veneers
How this post will look when shared
smilefy.com
Realistic 3D Veneers: Line Angles, Light Reflection & Texture in the AI Era
Why some veneers look alive and others look printed: how line angles, light reflection zones and enamel micro…