Perception of Smile Harmony in Asymmetrical Faces Using Smile Design
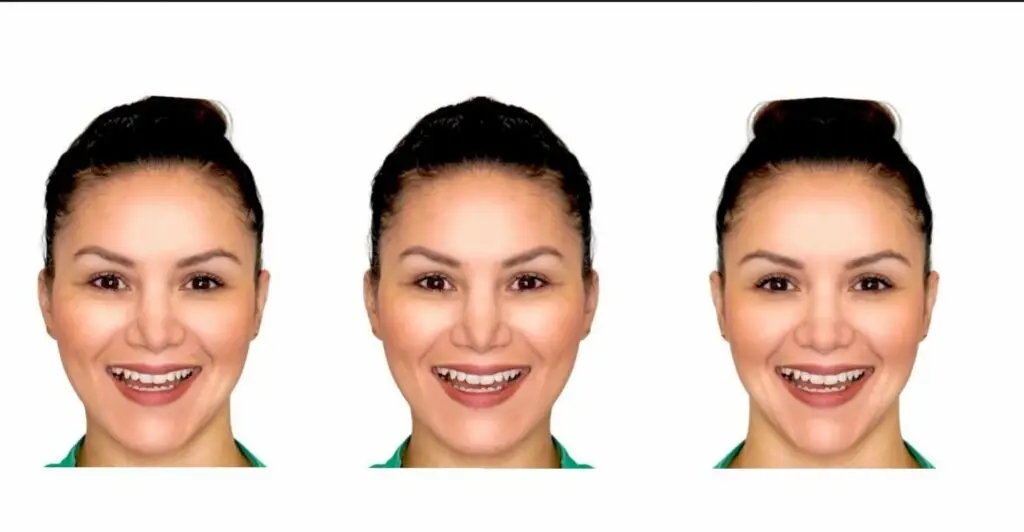
Smile Design in restorative dentistry has helped clinicians achieve optimal results for their patients while simultaneously improving their treatment planning skills.
Workflow Summary
Assess the Face First
Facial asymmetry occurs in 74% of lower faces. Design to the patient's unique face, not an idealised symmetrical template. [Severt & Proffit, 1997]
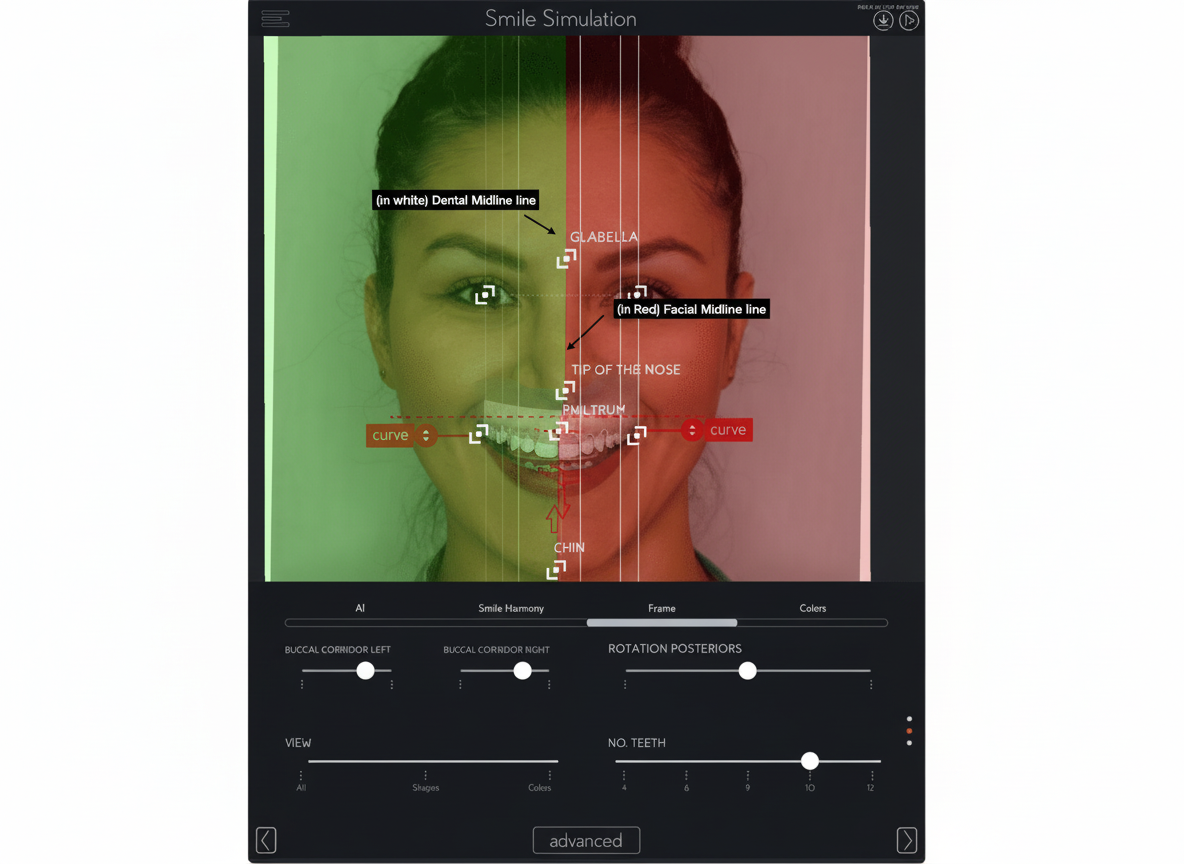
Establish Facial Midline
Use glabella, nasal tip, philtrum, and chin to derive a composite vertical axis — not the nasal tip alone. [Jayalakshmi et al., 2013]
Set Interpupillary Reference
The interpupillary line is the fixed horizontal reference. All other features are measured relative to it. [Padwa et al., 1997]
Evaluate Occlusal Plane Cant
Cant relative to the interpupillary line reflects lower-face asymmetry and guides restorative decisions. [Padwa et al., 1997]
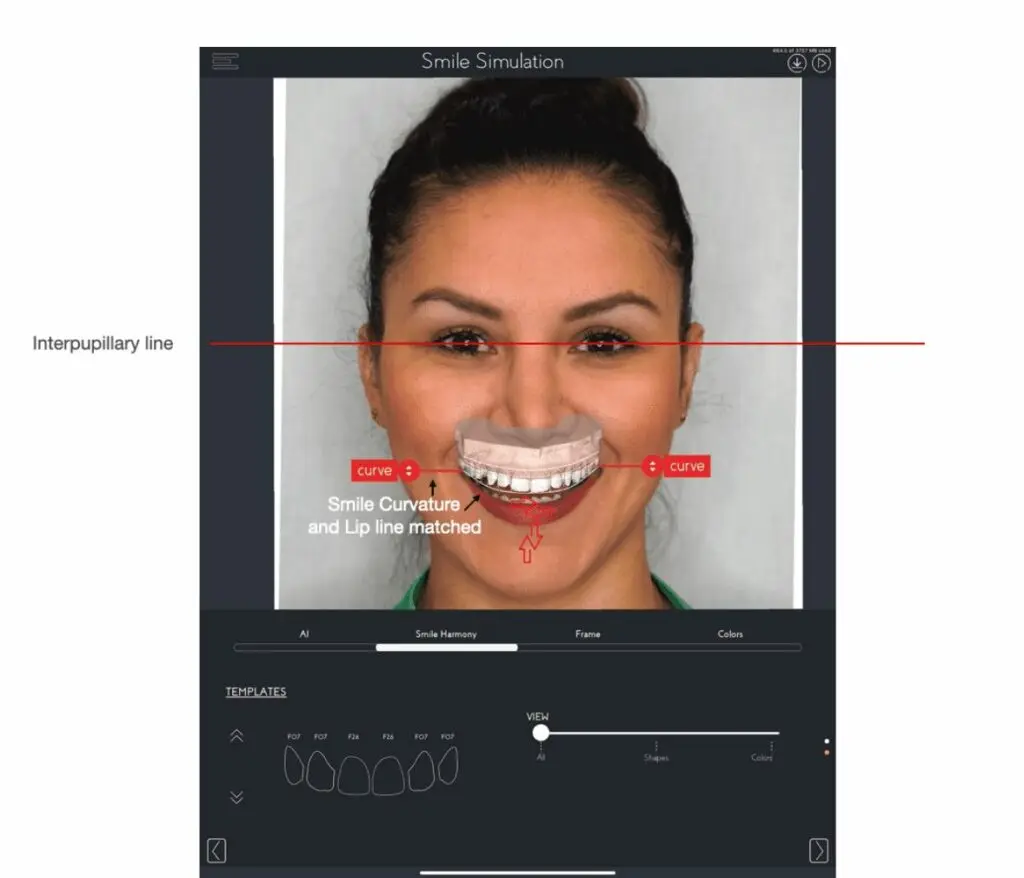
Match Smile Arc to Lower Lip
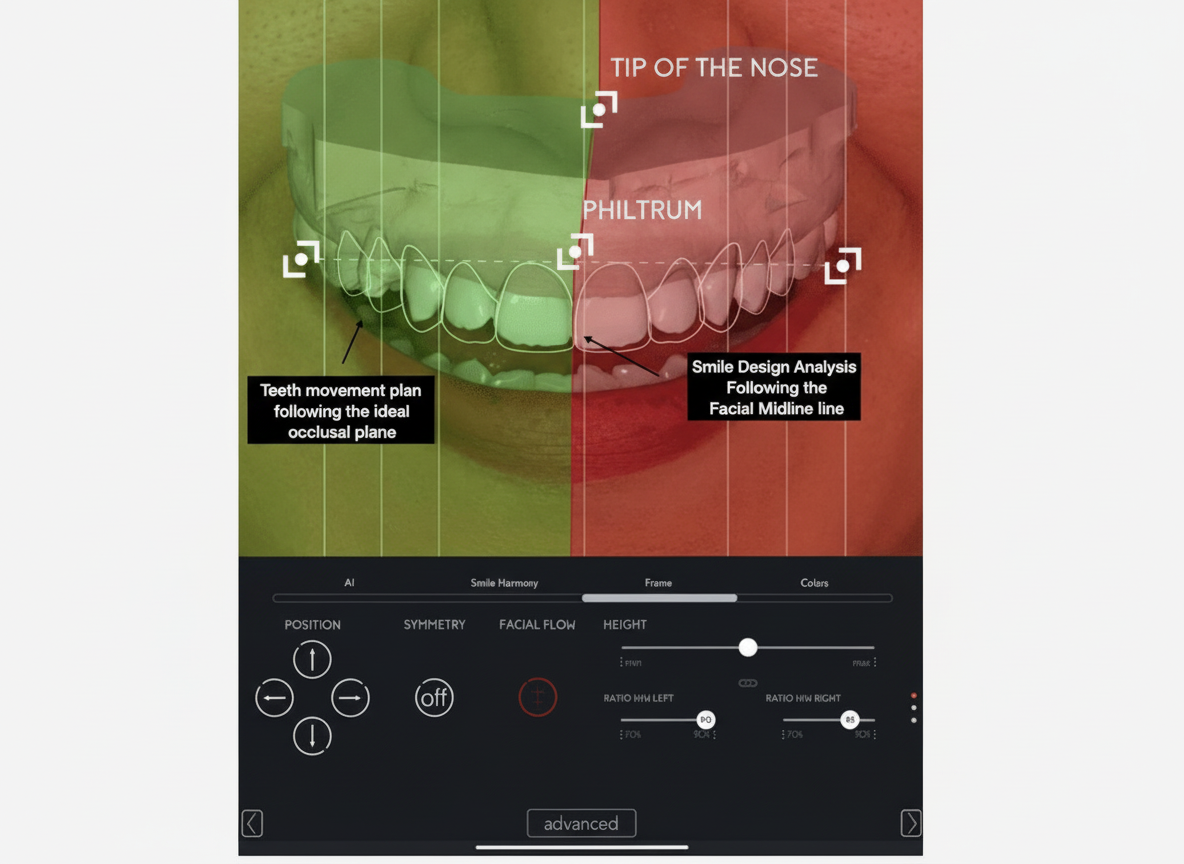
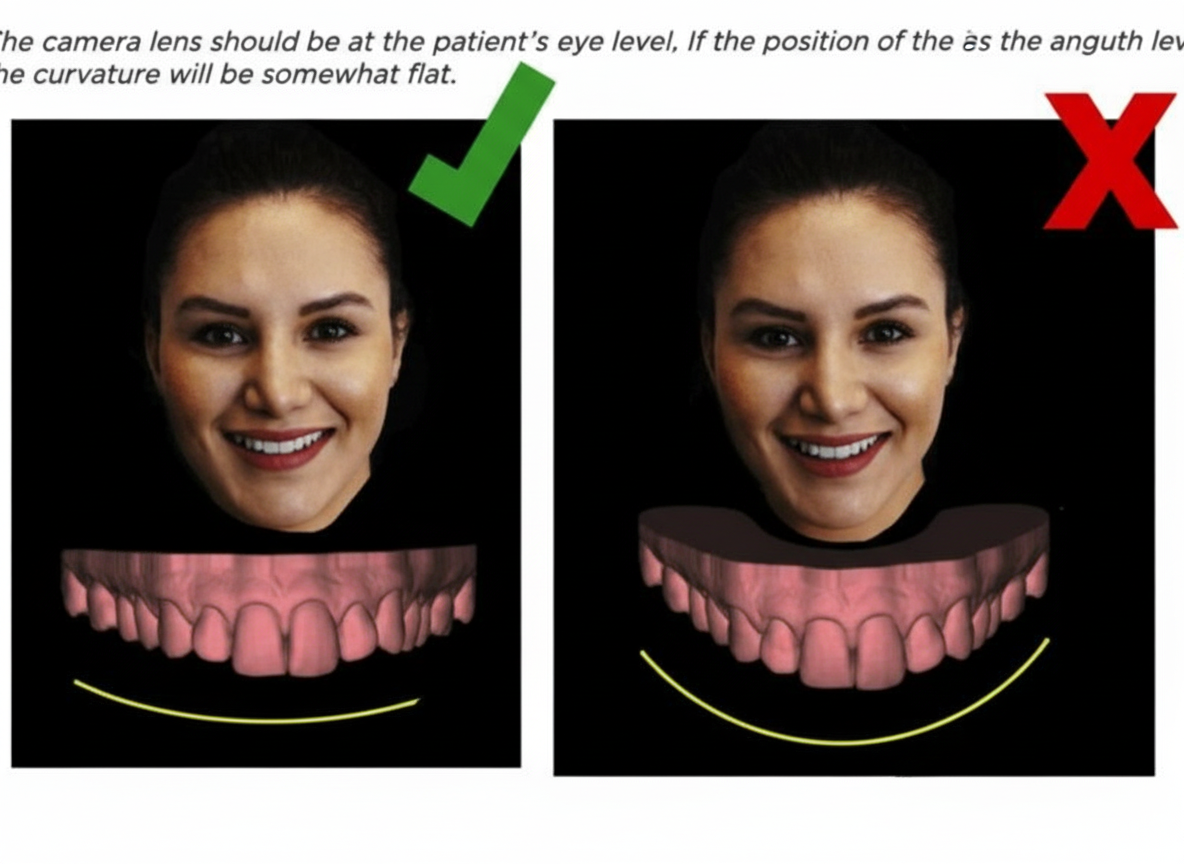
Incisal edges should be convex and parallel to the inner curvature of the lower lip. Flat or reverse arcs are perceptible disharmonies. [Thiesen et al., 2015]
Position Central Incisors
The midpoint between centrals should lie on the facial midline axis. Deviations up to 2.0–2.5 mm are imperceptible. [Jayalakshmi et al., 2013]
Capture Standardised Photograph
Patient standing, no obstructions, lens at eye level, full face in frame, spontaneous open smile. Verify before the patient leaves.
A facially-guided smile design that accounts for the patient's unique asymmetry — producing restorations that are visually harmonious in context, not just technically correct in isolation.
That being said, the three types of scenarios we most commonly hear from dentists when it comes to Digital Smile Planning narrows down to:
Dentists who hear about smile designs — but find it challenging to implement this workflow in their practice because they assume they don't have time to apply it in their day-to-day.
Dentists who benefit from using technology — by employing both analog and digital workflows for more predictable dentistry focused on multidisciplinary and conservative rehabilitation.
Dentists who are too comfortable with analog workflows — and are hesitant at trying something new or outside of their comfort zone.
Whichever type of dentist you can associate yourself with, digitally planning your smiles helps improve your aesthetic clinical planning and gives the patient a better understanding of the treatment that you propose.
Before starting your journey in the world of Digital Smile Planning, it is necessary to first understand why you are carrying out visual planning before starting the treatment, which is often irreversible.
Patient Centricity
The primary path is to understand why your patient came to your clinic and know how you can help them have oral health that goes beyond their expectations.
Why Should You Assess the Face, Not Just the Mouth?
What patients present as their chief complaint is not always the only — or primary — problem driving their aesthetic or functional dissatisfaction.
Focusing exclusively on the oral cavity in a patient with facial asymmetry produces restorations that are technically correct in isolation but visually disharmonious in context. The lower third of the face shows significant asymmetry in 74% of the population [Severt & Proffit, 1997] — meaning most patients you treat will have measurable facial discrepancy that must inform your design decisions.
Indications for a Full-Face Assessment Before Smile Design
Any patient presenting with aesthetic complaints — about tooth shape, size, or midline.
Pre-orthodontic treatment planning — where restorative finishing is anticipated.
Implant or multi-unit restorative cases — in the aesthetic zone.
Cases referred from another discipline — where the patient's facial profile has changed.
Patients with prior unsatisfactory restorations — attributed to a perceived midline or symmetry mismatch.
How Do You Gather the Clinical Information?
Through clinical examination, standardised photographs, and — where indicated — supplementary imaging, you establish the relationship between the patient's face and their dentition before placing a single restoration.
Standardised frontal smile photograph — see Step-by-Step Photo Protocol below.
Mirror-image analysis — create bilateral mirror composites (both-right-side and both-left-side) from the frontal photograph to visualise the full extent of facial asymmetry (Fig. 1).
Clinical examination — of lip dynamics, tooth display at rest and in full smile, and occlusal plane cant.
Supplementary CBCT or lateral cephalogram — where skeletal asymmetry is suspected.
Primary care assessment should be performed at the first appointment — before any clinical charting of the teeth. When you receive your patient, your eyes shouldn't be focused only on the oral cavity but also on the patient's face, paying close attention to the way the patients speak and the movements of their mouth and lips.
"To achieve a successful, healthy and functional result requires you to understand the interrelationship among all the supporting oral structures, combining the muscles, bones, joints, gingival tissues and occlusion." — Dawson PE, 1983
Your patient's face provides crucial information for creating a balanced treatment. Most of us have faces that are not symmetrical with the patterns given from scientific articles. This is due to proper genetic functions, posture, or habits. Thus, focusing only on the oral cavity can lead to a mismatch in harmony between the smile and the face.
Severt and Proffit reported frequencies of facial laterality of 5%, 36% and 74% in the upper, middle and lower thirds of the face respectively. With a more significant variation in the lower third, clinicians must pay attention to how to customize the position, angulation, and shape of the teeth according to the characteristics of the patient's face.
As long as the facial discrepancies are within the acceptable standard, the dentist should extol the patient's beauty and plan a smile that will match the uniqueness of his/her face.
Finding the right angle will help you determine your patient's facial midline and smile curvature.
Three Facial Features in Smile Design
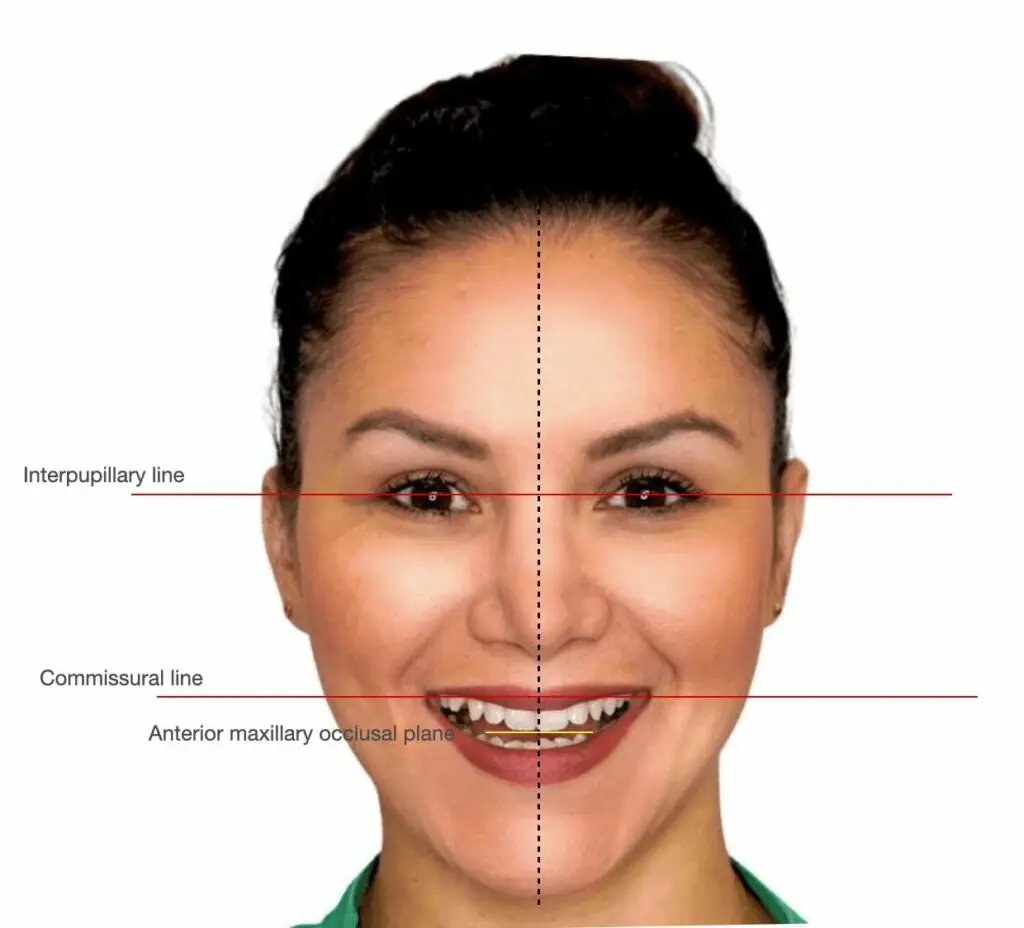
Facial Feature 1 — Interpupillary Line
The interpupillary line should be perpendicular to the facial midline and parallel to the occlusal plane when viewed from the anterior. It serves as the primary horizontal reference plane for all smile design measurements.
How to evaluate: Standardised frontal photograph with the patient's head in natural head position (NHP). Draw a horizontal line connecting the centres of both pupils. Compare to the occlusal plane and facial midline.
Tolerance: No established universal tolerance — the interpupillary line is the fixed reference, not the variable. [Padwa et al., 1997]
Facial Feature 2 — Lips
The lower lip curvature defines the required smile arc. The incisal edges of the upper anterior teeth should be convex and follow — not reverse or flatten — the inner curvature of the lower lip in the posed smile.
How to evaluate: Standardised frontal smile photograph showing maximum upper lip elevation and the mouth slightly open. Trace the lower lip curvature and overlay it against the upper incisal edge positions.
Tolerance: Smile arc should be consonant (parallel or slightly convex relative to lower lip). Reverse or flat arc is clinically perceptible. [Thiesen et al., 2015]
Facial Feature 3 — Facial Midline
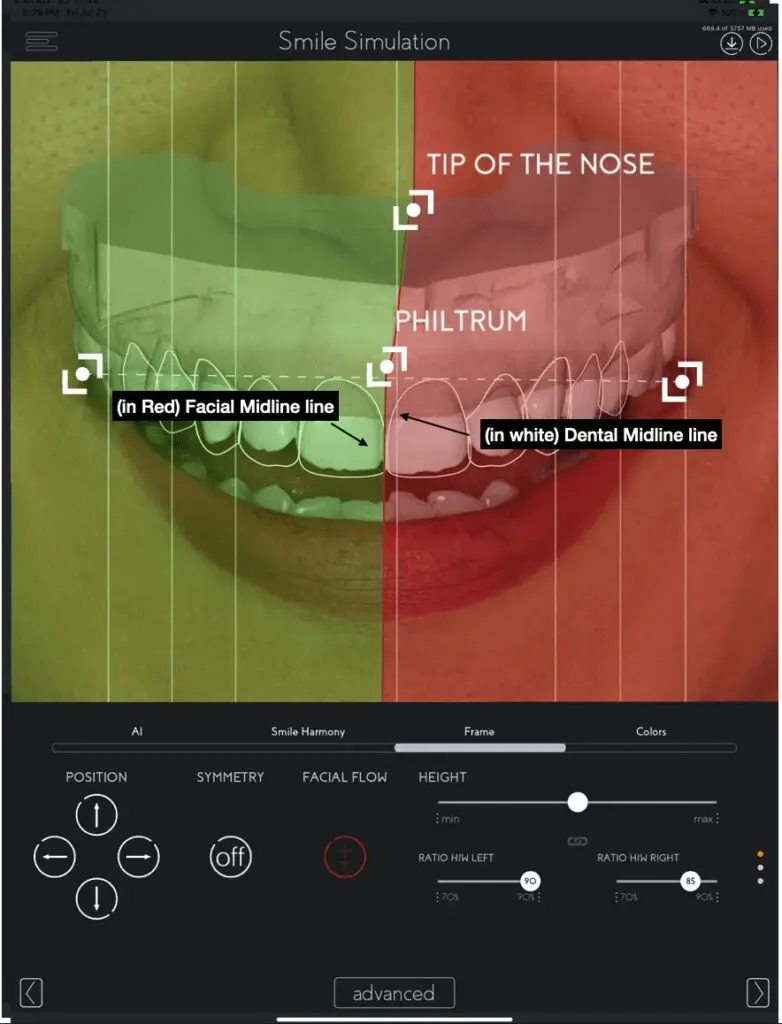
The imaginary vertical axis connecting the centre of the glabella, the tip of the nose, the philtrum (cupid's bow), and the tip of the chin. This axis is the reference against which the dental midline and the position of the central incisors are evaluated.
How to evaluate: Identify and mark each landmark and draw the best-fit vertical axis. Do not assume the nasal tip alone defines the facial midline — use multiple landmarks.
Tolerance: Dental midline deviation of up to 2.0–2.5 mm from the facial midline axis is within the acceptable standard. [Jayalakshmi et al., 2013]
Three Dental Features in Smile Design
Dental Feature 1 — Position of Central Incisors
The midpoint between the two maxillary central incisors should lie on the facial midline axis. Their position relative to the face is more perceptually significant than their position relative to each other.
Tolerance: Deviation of up to 2.0–2.5 mm from the facial midline is clinically acceptable. Deviations > 2.5 mm should be discussed with the patient. [Jayalakshmi et al., 2013]
Dental Feature 2 — Smile Curvature
The curvature formed by the incisal edges of the upper anterior teeth should be convex and parallel to the lower lip line in the posed smile. This consonant smile arc is a primary determinant of smile attractiveness.
Tolerance: A flat arc is perceptible; a reverse arc is highly perceptible and should be corrected. [Thiesen et al., 2015]
Dental Feature 3 — Position of the Occlusal Plane
The occlusal plane, viewed from the anterior, should be perpendicular to the facial midline and parallel to the interpupillary line. Cant of the occlusal plane relative to the interpupillary line is a clinically significant finding.
Tolerance: Clinically significant cant: > 3 mm vertical discrepancy between left and right occlusal plane heights. Skeletal cants > 3 mm typically require orthognathic surgery. [Padwa et al., 1997]
Where to Find These Features — Visual Reference
Step-by-Step Protocol: Taking the Frontal Smile Photograph
Photographs bring to life imperfections not readily visible to the patient — and sometimes, you.
A photograph of a spontaneous smile must be captured to show the maximum elevation of the upper lip with a spontaneous smile and the mouth slightly opened, to evaluate the parallelism of the curvature of the upper arch with the lower lip.
Step 1 — Patient Positioning — Ask the patient to stand upright with a natural, relaxed posture. Feet shoulder-width apart, weight evenly distributed.
Step 2 — Remove Obstructions — Remove glasses, hats, and heavy jewellery. Hair tucked behind both ears to expose the full facial contour bilaterally.
Step 3 — Camera at Eye Level — Position the camera lens at exactly the same height as the patient's eyes. Even a 10 cm deviation introduces measurable distortion.
Step 4 — Framing — Include the full face from hairline to chin, centred horizontally. Eliminate the shoulders. Include 2–3 cm of space above the hairline and below the chin.
Step 5 — Lighting — Use consistent, diffuse frontal lighting — no directional side lighting or flash casting shadows. The face should be evenly illuminated bilaterally.
Step 6 — Smile Cue and Capture — Ask the patient to look directly at the camera lens and give a natural, full smile with the mouth slightly open. Take multiple shots and select the one with maximum upper lip elevation.
Step 7 — Verification — Review the selected photograph on a larger screen to confirm: lens was level with eyes, interpupillary line appears horizontal, both ears visible, no obstructions, full face in frame. Retake immediately if any criteria are not met.
For a more comprehensive treatment plan, using your clinical knowledge, Digital Smile Planning can give you better aesthetic overview and ideal position of teeth in the upper arch in relation to the face for each patient, facilitating the communication with other dentists and involving them in the multidisciplinary treatment workflow. A workflow everyone can benefit from.
References
[1] Thiesen G, Gribel BF, Freitas MP. Facial asymmetry: a current review. Dental Press J Orthod. 2015;20(6):110–125.
[2] Dawson PE. Determining the determinants of occlusion. Int J Periodontics Restorative Dent. 1983;3(6):8–21.
[3] Severt TR, Proffit WR. The prevalence of facial asymmetry in the dentofacial deformities population. Int J Adult Orthodon Orthognath Surg. 1997;12(3):171–6.
[4] Jayalakshmi NS et al. Acceptable Deviation between Facial and Dental Midlines in Dentate Population. J Indian Prosthodont Soc. 2013;13(4):473–477.
[5] Padwa BL, Kaiser MO, Kaban LB. Occlusal cant in the frontal plane as a reflection of facial asymmetry. J Oral Maxillofac Surg. 1997;55(8):811–816.
How this post will look when shared
smilefy.com
Perception of Smile Harmony in Asymmetrical Faces Using Smile Design
Learn why facial asymmetry — present in 74% of lower faces — must guide your smile design decisions, and how…